Need a see thru ruler, mechanical pencil and sharp scissors. I also used spray starch (which I now love, thanks to Patti and Cindy this past weekend) and I pinned my pieces together before sewing.
For each block background I cut 3 (light print) squares 4 7/8 inches. 1 (red) 4 7/8 inch square and 1 (red) 7 5/8 inch square.
Here are photos I took along the way so I could share the method I used with you:
Mark diagonal lines on the (red)- make sure you mark the piece that you want to be the triangle accent- Yes, in my first effort I marked the light and cut it and had to start over. This photo does not show the 4 7/8 inch light block- trust me though it's under there.
With right sides together take the (red) 4 7/8 inch square and 1 (light) 4 7/8 inch block pin in the middle of each side. Sew around all 4 sides of the 4 7/8 inch square. Stop at the pencil line (1/4 inch from the edge). aka Pivot at the pencil line
The photo above is to show the pivot
Cut along the pencil lines, be careful and cut on the line only- stop right before the stitching. yes I learned this one the hard way too.
Cutting the blocks open
Press and use spray starch. This is where I started to get worried about the points.
Take the other 2 light 4 7/8 inch squares and cut them in a diagonal.
Pin 2 of the triangles to opposite sides. Sew and then open and press, use spray starch. Then pin and sew on the other 2 triangles to the other sides. Again, open and press use spray starch.
This is where my panic really set in- look at the sides of the inner square- yikes, I was thinking I had measured wrong. Good news was I actually did not cut until I figured out the next step and discovered the awesomeness of this.
Cut in to 4 pieces cutting in a diagonal. See how the space I thought was a mistake works out great
to cut to 4 triangular pieces!
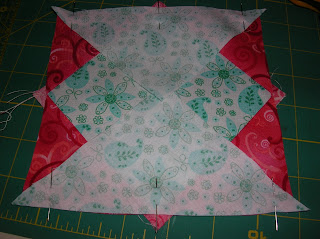
Pin 2 of the triangular sections to each side of the 7 5/8 (red) square.
Press open, use starch. Look at how awesome the point is!
Pin and sew the other 2 opposing triangular sections to the 7 5/8" block
Press Open and use some more of that starch stuff!


No comments:
Post a Comment